A real estate window shot I pulled back
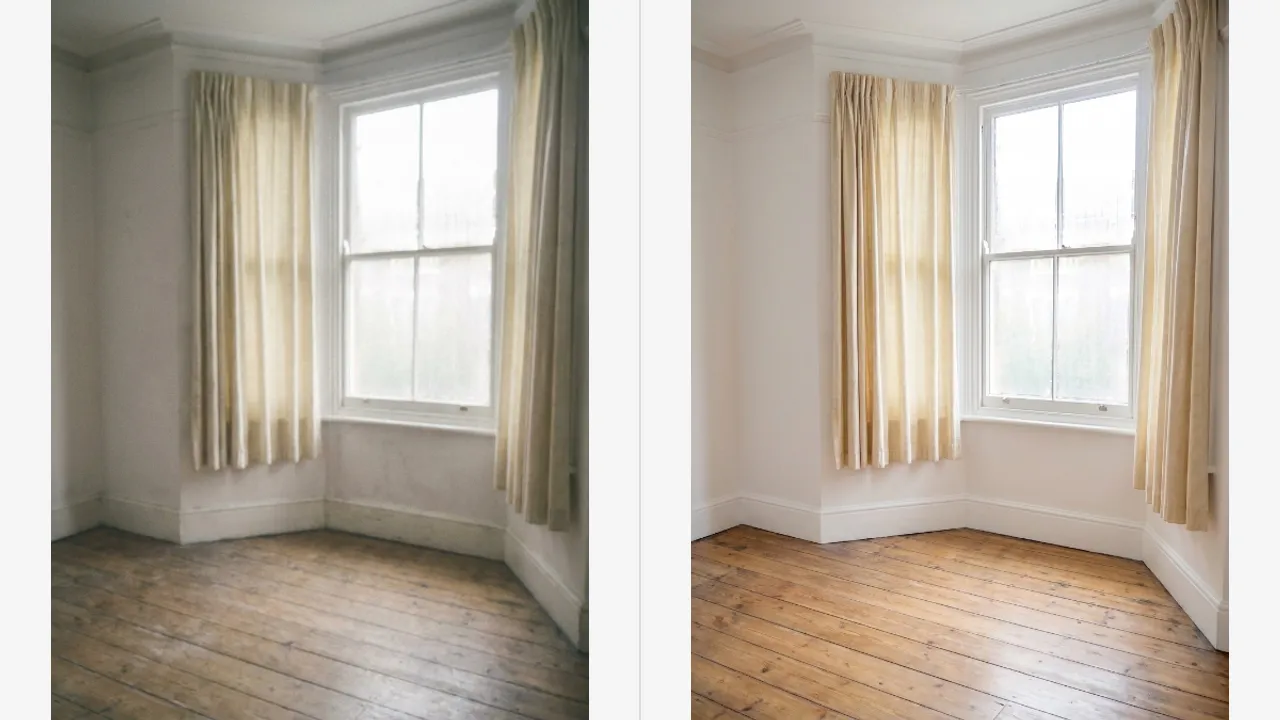
A living room photo shot against a bright window went soft everywhere. Here is what the Picverce AI Image Sharpener recovered and what it could not.
MarketingThe listing photos were due on a Monday and the room I needed most was the one that went wrong.
South facing living room, large sash window, shot at four in the afternoon. Every frame came back soft and slightly washed, the way rooms do when you meter for the room and let the window blow out.
Reshooting meant another appointment with the owner. So I tried to save the file instead.
What was actually wrong with the file
It helps to name the fault before picking a tool, because soft is three different problems wearing the same word.
This was not motion blur. The camera was on a tripod and the horizontal lines in the floorboards were straight rather than smeared in one direction.
It was not noise either. The exposure was long and the shadows were clean.
It was a focus and contrast problem. Backlight scattering off the glass had lifted the black point across the whole frame, so the window frame, the curtain folds and the floorboard grain all lost their edges at once.
That specific fault is what a sharpening pass is for. A general cleanup would have chased noise that was never there.
There is a quick test for this if you are unsure which of the three you have. Zoom to a hard edge somewhere in shadow, away from the light source.
If that edge is soft too, it is focus or contrast. If it is crisp while the bright side of the room is not, the window is doing it, and that is the case I had.
The run itself
I opened the AI Image Sharpener and dropped the JPEG in. It bills 2 credits and there is no strength control, so there was nothing to configure.
The pass is built for edge recovery rather than general cleanup. That shows up in the result, because it commits hard to edges it finds and leaves flat areas mostly alone.
The file was 3.1 MB, comfortably under the 5 MB upload cap. It came back in under a minute.
No settings is the right design for this job, though it took me a while to accept that. There is no strength dial to get wrong and no radius to overcook, which are the two ways a manual sharpen usually goes bad.
The cost of that simplicity is that you cannot ask for less. If the pass is too strong for your photo, your only move is to not use it.
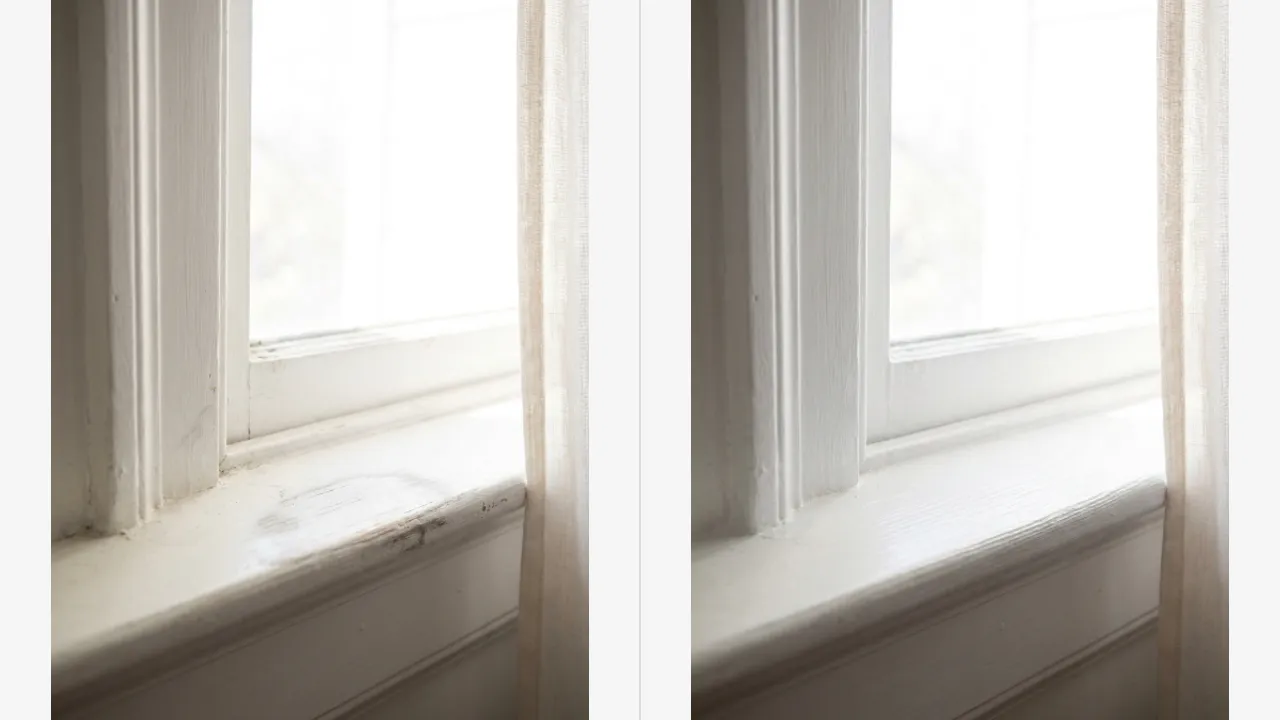
What came back and what did not
The window frame was the clear win. The white painted mouldings went from a soft grey suggestion to a defined edge with visible brush texture.
Floorboard grain returned across the middle of the room. That mattered more than I expected, because grain is what tells a buyer the floor is real wood.
The curtain weave came back partially. Where the fabric was in shadow it read as cloth again. Where it was directly against the bright glass it stayed as a pale shape.
That last part is the limit worth naming. Detail that the sensor never recorded does not come back, and a blown highlight has no detail underneath it to find.
The view through the glass stayed gone. Nothing recovers a clipped white rectangle, and a tool that pretended otherwise would be inventing a garden.
The ceiling gained an edge it did not need. Where the wall met the coving the pass drew a line that is slightly harder than the real one, which reads as fine at listing size and slightly odd at full zoom.
The radiator under the window came back well. Metal has hard edges and regular slots, which is the easiest possible material for a pass like this to work on.
That pattern held across the whole frame. Anything with structure improved, anything defined by soft gradients did not move much, and anything clipped to white stayed clipped.
Whether it was worth 2 credits
For a listing, yes, comfortably. The photo went from one I would have quietly dropped to third in the set.
The alternative was a second appointment. An hour of driving, an hour on site and a homeowner who had already rearranged their morning once.
Against that, 2 credits and a minute is not a close call. The agent never asked which photos had been processed and I would not have hidden it if they had.
The honest framing is that it recovered a usable photo rather than a good one. A properly exposed frame with the curtains half drawn would still beat it.
I did not upscale afterwards, and that was deliberate. Listing portals resize everything anyway, so the AI Image Upscaler would have cost credits for pixels the site was about to throw away.
For a soft phone photo the sequence is different, and that one is worked through in clean up a soft phone photo in four steps.
What I do differently on site now
Two habits came out of this, and both cost nothing on the day.
- Shoot the window rooms first, while the sun is still off the glass.
- Take one frame metered for the window and one for the room, even when only one will be used.
- Check a bright edge at full zoom on the camera before packing up, not on the small preview.
- Keep the original file. A sharpening pass on an already sharpened copy hardens edges that were invented the first time.
The last one caused a wasted run before I learned it. Two passes gave me a window frame that looked drawn rather than photographed.
One pass on the original, judged at full size, is the whole technique.