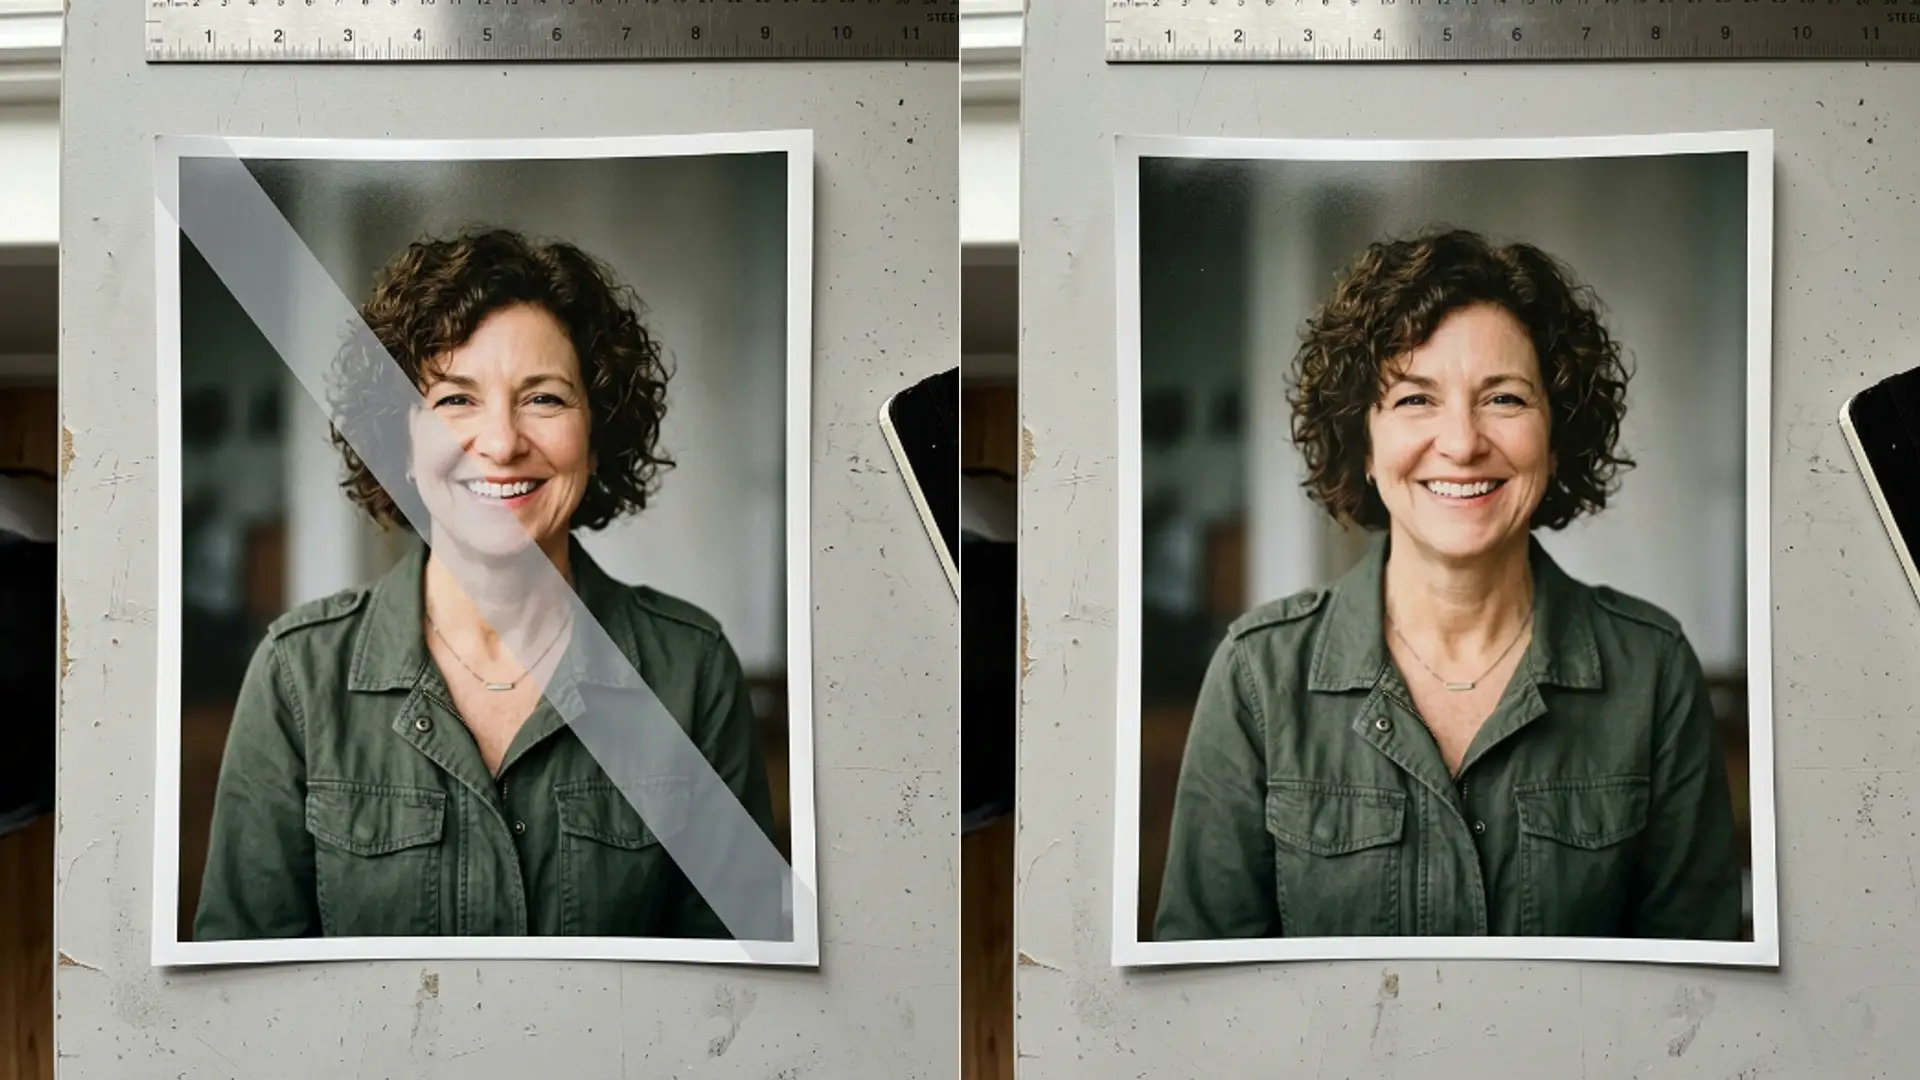
A client proof without the overlay
A photographer cleared her own proof overlay from selected frames with the Picverce AI Watermark Remover. What worked and where she stopped.
MarketingA photographer I know marks every proof gallery with her studio name across the middle. Clients pick from the marked versions and she delivers clean files after payment.
The system works until the clean master goes missing.
Hers went missing in the ordinary way, which is to say nobody noticed until somebody needed it.
The situation worth being clear about
She had a drive fail two years ago and the backup turned out to be less complete than she thought. What survived was the export folder of marked proofs, not the originals.
A client from that year came back wanting prints. The only files anybody had were the ones with her own name stamped across them.
Reshooting was not an option. The people in the photographs were a wedding party and the day does not happen twice.
That is the case the AI Watermark Remover is for. Her photographs, her overlay, her decision to take it off.
It is worth saying plainly what the tool is not for. Taking a mark off work that belongs to somebody else does not give you permission to use it.
A watermark is usually there because the image is licensed or unpaid. The tool has no way to know that, so the judgement is yours.
She only ever runs her own frames through it. That rule has never been inconvenient, because those are the only files she has any use for.
The tool itself says the same thing on its page. Only use it on images you own or have the rights to edit.
A mark often signals a licence you do not hold, and taking it off does not create one.
Automatic first then manual
There are two modes and the order to try them is not a preference.
Automatic detection finds the mark on its own. Start there, because it handles the ordinary case in one pass.
Manual mode gives you a brush and you mark the exact area to rebuild. Switch to it when the overlay sits over busy detail, or when automatic caught most of the mark and left a corner.
Her studio name is a plain text overlay, which is the easiest kind. Text overlays, logos, signatures and date stamps are what the tool expects.
Small, high contrast marks over simple backgrounds come off most cleanly. Hers sat across a sky on about half the set, and those were done first time.
Sky is the ideal case for the same reason it is ideal everywhere else in removal work. Continuous, predictable, nothing to line back up.
The frames that needed manual mode were the ones where the name crossed a hedge. Fine repeating texture is the difficult case, not the mark itself.
A semi transparent mark over foliage is two problems at once. The tool has to work out what the mark was hiding and then match a pattern it cannot fully see.
Manual mode helps because you can mark exactly the strip that needs rebuilding instead of a generous box around the whole name.
Each pass costs three credits, so working through thirty proofs is a small spend against a reshoot that cannot happen.
Uploads are capped at five megabytes, which meant shrinking a few of the bigger proofs slightly before they would go through.
She did the set over an evening rather than in one batch. Checking each frame properly takes longer than the processing does.
What survived and what did not
Twenty two of her thirty frames came back with no trace of the overlay.
Six needed a second pass. The mark was gone after the first run but a faint difference in texture showed where it had been.
The second pass on those went over the ghost rather than the original mark. Treating the leftover as its own smaller job worked better than starting again.
Two she gave up on. The name ran across a face on both, and rebuilding part of a face is not something she will send a client.
That is the honest boundary. A large mark stretched across busy detail leaves something behind, and a face is the detail people notice.
She checked every frame at full size before delivering. A faint texture difference is invisible on a phone and obvious in a print.
Zooming to a hundred percent on the exact strip where the overlay sat is the check that matters. Everywhere else in the frame is untouched.
Output comes back at the resolution she uploaded with no mark of its own added, which mattered because these were going to a lab.
What she changed afterwards
Three things, and none of them are about the tool.
She moved the overlay to a corner instead of the middle. A mark in a corner still deters casual copying and sits over less of the picture.
Casual copying is all a proof mark ever stopped anyway. Anybody determined enough has the same tools she does.
The point of the overlay is to make the clean version worth paying for, and a corner does that as well as a diagonal across the middle.
She keeps clean masters in two places now. The recovery worked, and she would rather not need it again.
She stopped putting the mark across faces at all. That was the one case the repair could not solve, so she removed the case.
For a mark she wants gone from a specific spot rather than found automatically, the AI Object Remover gives her the same brush idea with more control over exactly what gets rebuilt.
Sending a client a set of options and letting the pictures do the talking is the same method a tattooer uses in a client mood board before the appointment.
Your own work, automatic first, check at full size, and accept that a mark across a face is the one that does not come back.