Scan and restore a family print
A repeatable way to scan an old family print, run the Photo Restore pass, and decide whether colorizing it after is worth the extra credits.
TutorialsA box of family prints turned up at my parents place last year, most of them creased, a few with a corner missing. This is the pass I ran on the one worth saving first, in the order that actually worked.
Get a clean capture first
The scan or photo you start from sets a ceiling on the result. A repair pass can fix damage, but it cannot recover detail that was never captured in the first place.
- Use a flatbed scanner if you have one, at 300 dpi or higher, with the print flat and the lid closed to block glare
- If you are photographing the print instead, use even daylight near a window rather than a flash, which bounces off glossy paper
- Fill the frame with the print and keep the camera parallel to it, not angled, to avoid a trapezoid crop later
- Wipe dust off the print and the scanner glass first. Dust reads as damage the same way a scratch does
I used a phone camera for mine, propped against a stack of books at window height so the angle stayed flat. It took three tries to get the glare off one corner.
A tripod or a stack of books does more for this than a steadier hand does. Even a small tilt between shots changes the crop enough that comparing before and after later feels like two different photos.
Run the restore pass
Upload the file to Photo Restore. It accepts JPG, PNG, and WEBP files up to 5 MB, and a typical print finishes in under a minute.
The pass targets scratches, tears, fading, discoloration, dust spots, and general damage from age. It works on scanned prints and on digitized negatives the same way.
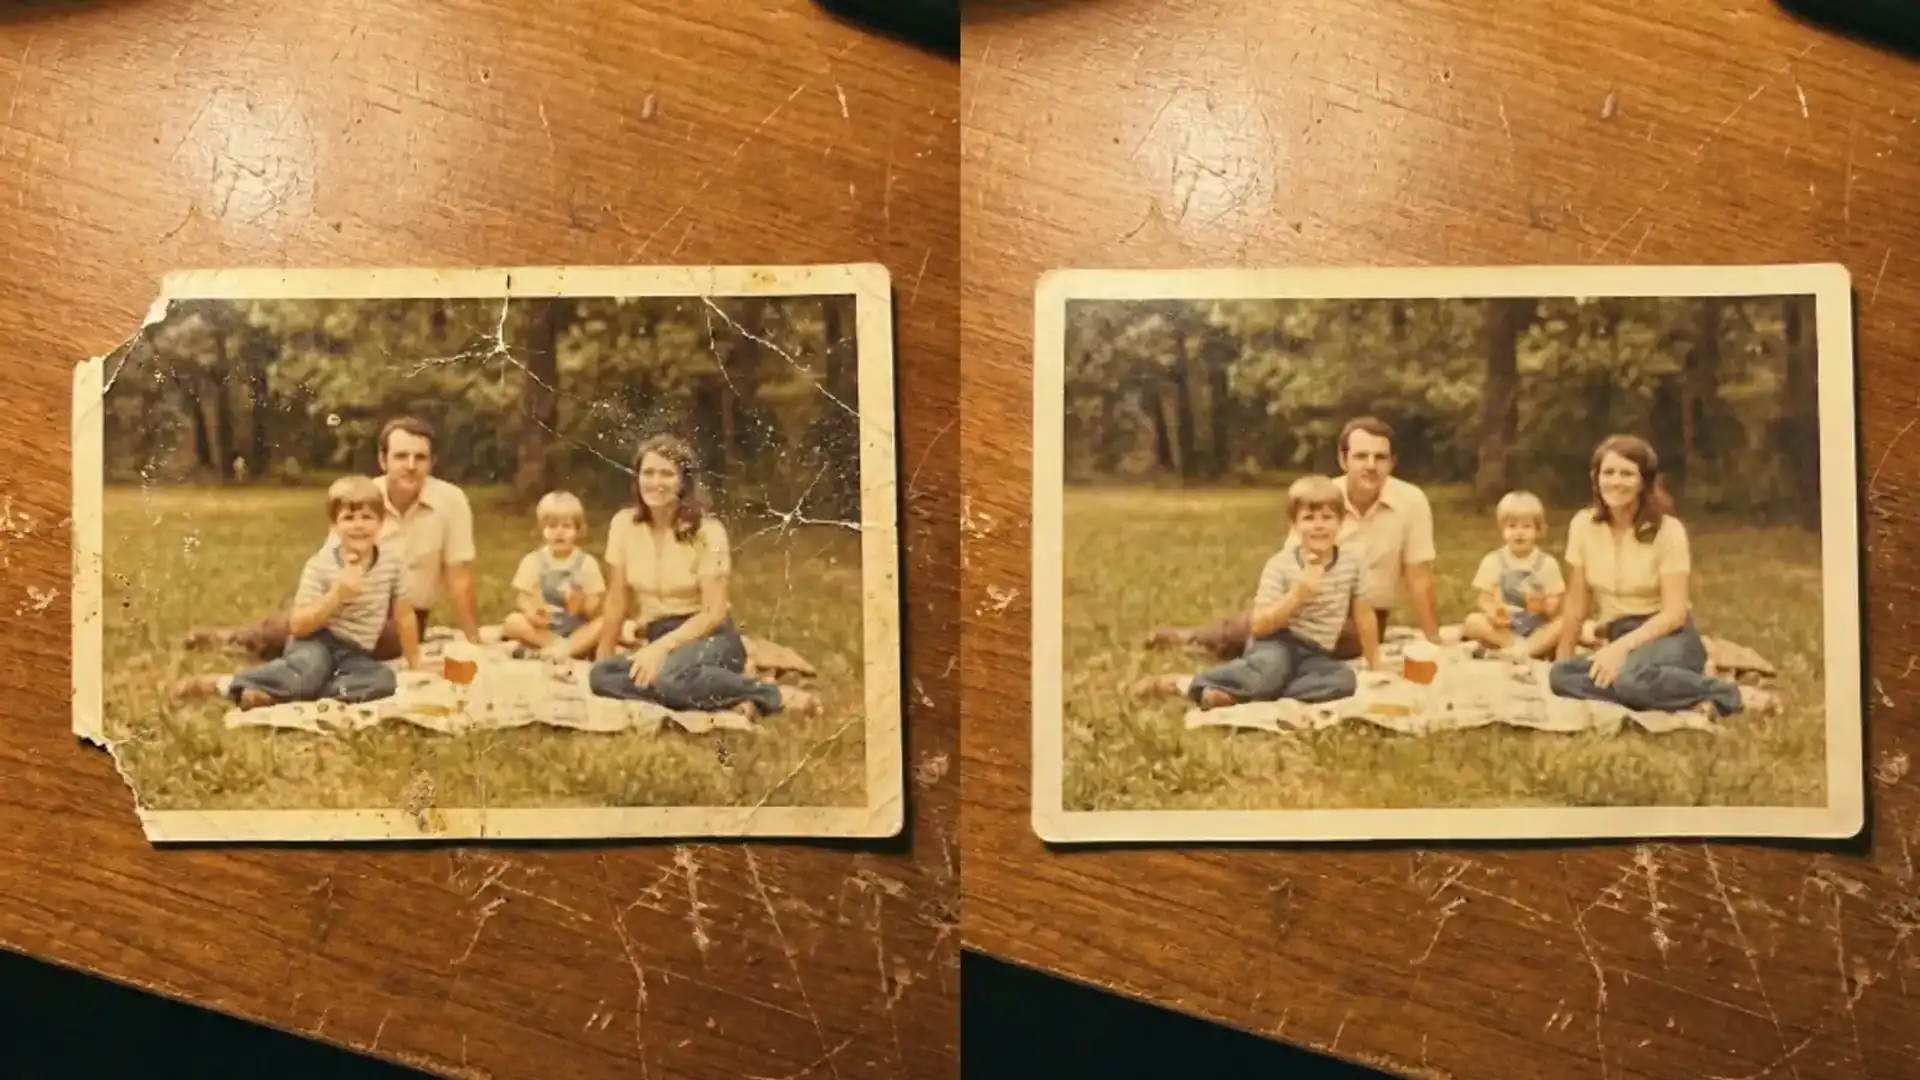
It runs as one step, not a set of sliders. Upload, wait, and the before and after slider shows the result the moment it finishes.
That single step design is worth knowing going in. There is no way to tell it to focus on one corner of the print or leave the rest alone, so a photo with damage in one spot and a clean rest gets one pass across the whole frame either way.
A restore run costs 4 credits. On the free plan that leaves a little room in the daily 10 credit refill for a second attempt if the first pass misses something.
Check the result before you decide on color
Drag the slider slowly across every crease and tear you noticed in the original. Most close up cleanly. A few, especially where a chunk of the print is actually missing, leave a slightly soft patch where the tool filled in a guess.
That soft patch is worth knowing about before you move on, because a second tool run later can make it more obvious rather than less.
On mine, a torn corner near the edge of the frame came back as a plausible continuation of the background rather than the missing piece itself, since there was nothing left in the file to rebuild it from. It reads fine at a glance and would not survive a close side by side with the original scene.
Photos are processed automatically and are not kept on the server once the job finishes, so downloading the result before you close the tab matters more here than on a tool you might revisit.
When to colorize after
If the print was black and white, Image Colorizer is the next step, and the order matters more than it looks like it should.
Restore first, then colorize. Running color on a scratched, faded original means the model is coloring the damage along with the photo, and scratches sometimes pick up a color cast the same as the skin or fabric around them.
Colorizing a clean, restored file avoids that. It costs 3 credits on top of the 4 for restore, so the full pass on one print is 7 credits total.
Not every print needs color. A formal portrait or a photo where the black and white look already reads as intentional is sometimes worth leaving alone, especially if the print is going back into a frame next to other black and white photos from the same era.
Save the file that matters
Keep the raw scan somewhere separate from the restored download. If a later pass goes wrong, the raw file is the only way back to a clean starting point.
I renamed mine with the year on the print rather than the scan date, since that is the detail I would actually go looking for in a folder of forty scans a year from now.
A short note in the filename about who is in the photo helps just as much. Six months later, a filename like the year and a name finds the print faster than scrolling through a folder of otherwise identical thumbnails.
If you are also weighing whether to run a general enhance pass instead of restore on a photo that is soft but not damaged, enhancer or upscaler which one to run first covers that decision for undamaged files.