A whiteboard photo from a meeting I had to keep
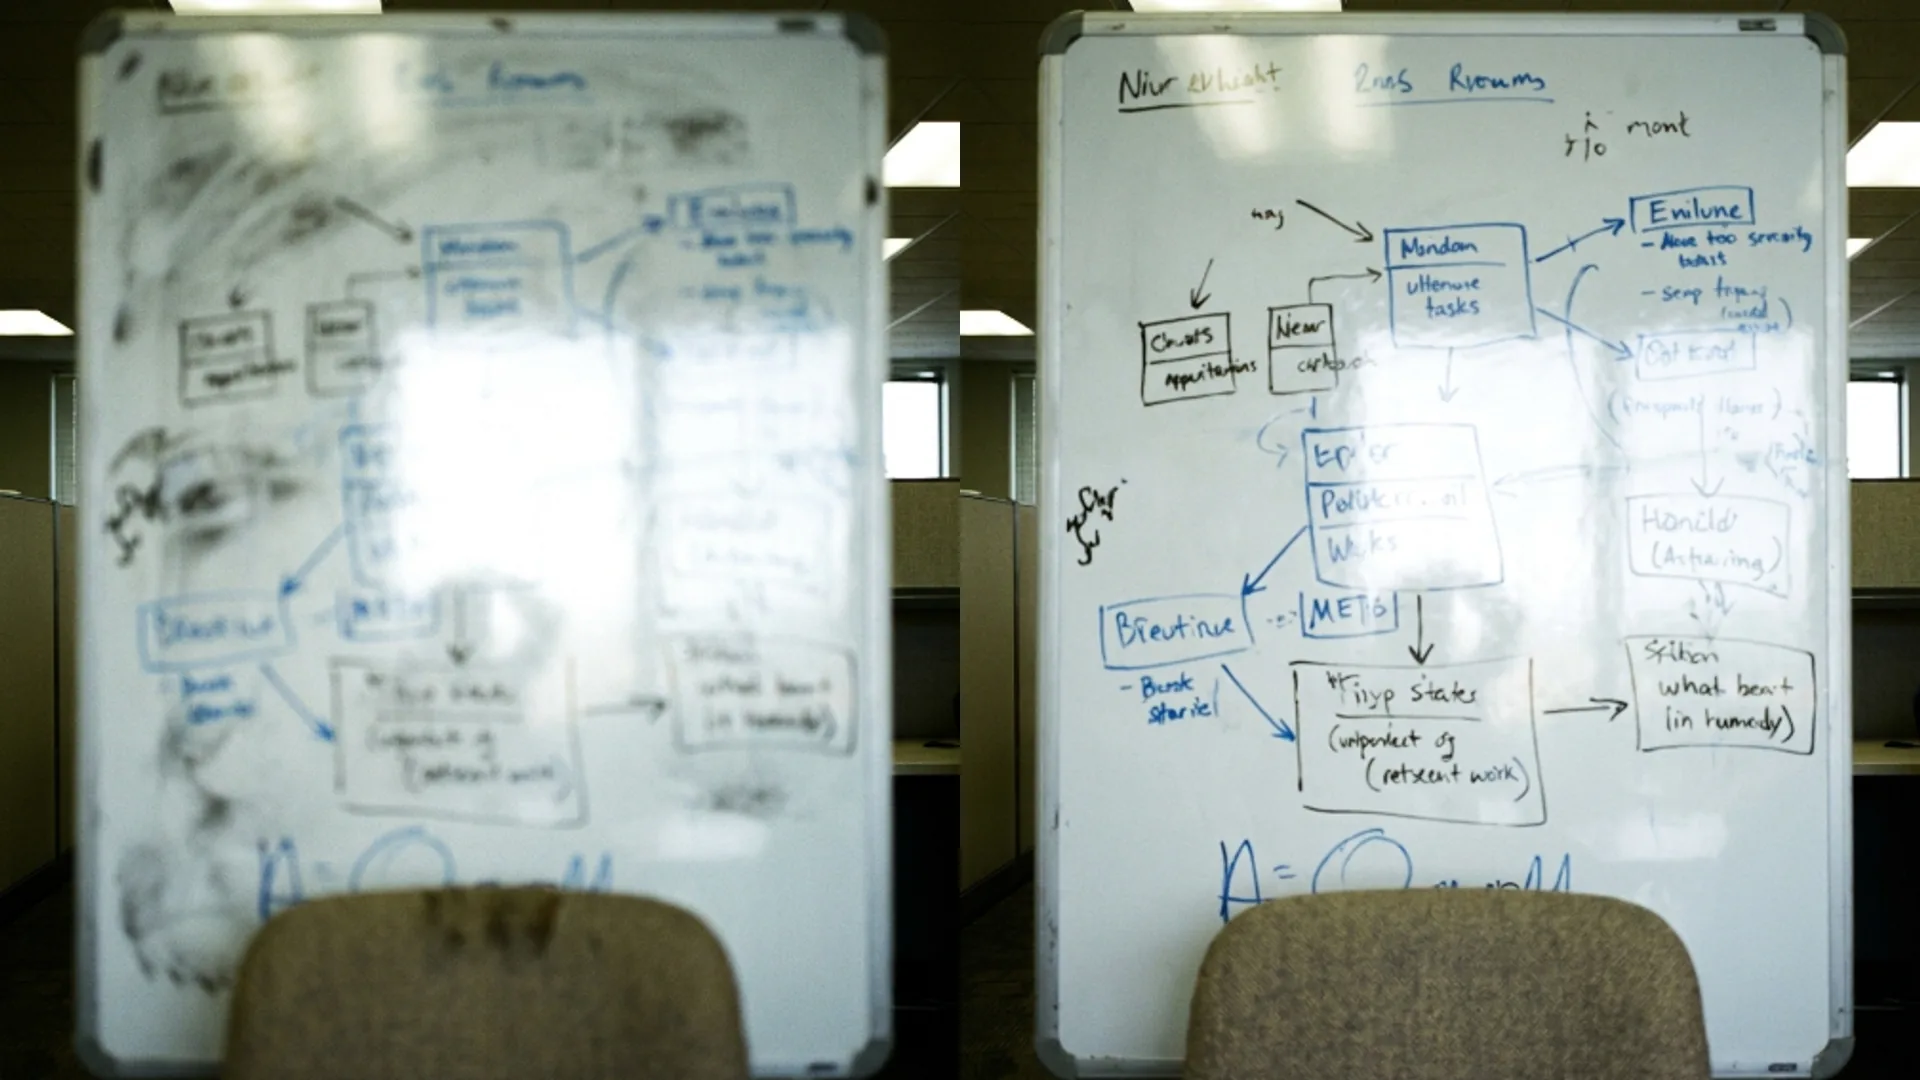
A whiteboard photo shot at an angle under glare and bad light, cleaned up with the Text Enhancer until the meeting notes were actually usable.
MarketingSomeone erased the whiteboard ten minutes after a planning meeting ended, which is exactly when I remembered I had not written any of it down myself. The only record was a phone photo shot fast, at an angle, under fluorescent light.
Half the board was legible. The other half was a wash of glare and marker that had gone thin near the end of the pen, right where the most important column of notes happened to sit.
What the photo actually looked like
The right third of the board had a bright strip running through it where the overhead light bounced straight back at the camera. Under that strip, the text was not blurry, it was simply gone.
The left side was readable but faint, written in a marker that was clearly running low. Thin strokes on a whiteboard photograph worse than they look in person, since a phone camera compresses the contrast between marker and board more than your eyes do.
I did not reshoot, since the board was already half erased by the time I opened the photo on a laptop screen and saw how bad it was.
A few of the action items lived only on that faint left side, in handwriting small enough that even zooming in on the phone did not help much. That is what pushed me toward actually running a tool on it instead of just squinting harder.
Running the text pass
The AI Text Enhancer is built for exactly this, images where the point is reading the text rather than admiring the photo.
It takes the same file types and 5 MB cap as the rest of the workspace, and a whiteboard photo at normal phone resolution finished in well under a minute.
I uploaded the full photo rather than cropping to the faint half first, mostly to see whether the glare strip would drag the rest of the result down with it. It did not. The two halves of the board were treated independently enough that the readable side improved on its own.
The glare strip did not fully recover. What had been a bright wash with no visible stroke stayed unreadable, since there was no marker edge left in the file for the pass to work from.
The faint left side improved a lot. Thin strokes that had been barely visible against the board came back dark enough to read at a normal zoom level, without the board turning grey or noisy the way a general sharpen might have made it look.
A run on this tool costs 8 credits, noticeably more than the 2 credit tools in the same workspace. That price difference is worth knowing before you upload a whole folder of meeting photos rather than the one that actually mattered.
The free plan refill of 10 credits a day covers one run of this tool with almost nothing left over, so a whiteboard photo is a decision worth making on purpose rather than uploading on a whim the way a 2 credit tool invites.
A second pass on the rest of the photo
Once the text itself was legible, I ran the same file through the AI Image Sharpener for 2 more credits, mostly to tighten the edges of the board frame and the sticky notes pinned next to it.
That second pass is a different job from the first. The text tool is reading marker strokes and pushing them toward legible. The sharpener does not know what text is, it just tightens edges across the whole frame, which helped everything except the glare strip that had nothing left to sharpen.
The two runs together cost 10 credits for one photo, which sounds steep until it is measured against redoing the meeting to recover notes that a coworker half remembered a week later.
Running them in that order mattered. Sharpening first and clarifying text second would have pushed noise into the faint strokes before the text pass had a clean version to work from.
What I would do differently next time
Angle the phone straight on rather than from a seat across the room. The glare strip existed because of where I was sitting relative to the light, not because of anything about the board itself.
Take two photos from slightly different positions when a board matters. Overlapping the readable halves of two shots would have saved the glare strip entirely, since a tool can only work with strokes that exist somewhere in the file.
Turning off the overhead light and using the window instead would have avoided the glare strip in the first place. That is an easy fix to forget mid meeting, when nobody wants to be the person fiddling with light switches.
Photograph a whiteboard the moment the meeting ends rather than after, since I lost the chance to reshoot the moment someone reached for the eraser.
The same before and after logic applies to plenty of quick documentation shots beyond meeting rooms. An Etsy listing I cleaned before it went live walks through a similar rescue on a product photo shot under worse light than it deserved.
The notes made it into the project doc that afternoon, glare strip aside. Two of the action items from that gap in the board came up again a week later in a follow-up call, which is the part that actually justified spending the 8 credits in the first place.