Picverce AI Object Remover masks
How the brush builds a mask in the Picverce AI Object Remover, why the tool grows your mark, and which backgrounds fill in without leaving a trace.
GuidesMost tools on the site take a photo and a setting. This one takes a photo and a drawing you make yourself.
That drawing is the whole instruction. The AI Object Remover has no prompt box and no style grid, so everything depends on where you put the brush.
Understanding what that brush produces is the difference between one clean pass and six frustrating ones.
Each pass costs two credits, so a run that misses is cheap. Six of them in a row is still annoying.
What the brush actually sends
Your strokes become a second black and white image the same size as your photo.
White marks what should go. Black marks what stays. Nothing else is communicated.
That is worth holding onto because it explains the tool completely. There is no way to say remove the lamppost but keep the wire. You can only paint.
Anything you can express by painting, the tool can do. Anything you cannot, it cannot, and no amount of rerunning changes that.
Your mark does not go across exactly as you drew it though. Three things happen to it first.
- Small gaps inside a stroke get closed, so a scribble becomes a solid shape.
- The shape grows outward by a few pixels, fading as it goes, which gives the fill some room to work with.
- The edge is softened so the repair blends instead of stopping at a hard line.
The growth step is the one worth knowing about. You do not have to trace an outline perfectly, because the mask expands past whatever you painted.
It also means painting right up against something you want kept will eat a little of it. Leave a small gap between your stroke and anything precious.
When I removed a bin from a pavement shot, my first attempt clipped the shoe of a person standing beside it. Backing the stroke off by a few pixels fixed it on the next run.
The softened edge is the other half of why the result looks natural. A mask with a hard boundary produces a repair with a visible seam around it.
You get that softening for free, which is why hand drawn masks from other tools sometimes look worse here than a rough scribble does.
Brush size and the two modes
The toolbar is small and every control on it matters.
- Brush paints the mask. Eraser takes marks back off it.
- The size slider runs from 30 to 150 pixels and starts at 100.
- Draw mode paints. Pan and zoom mode moves the image instead, with a reset view button beside it.
- Clear wipes every mark and starts you over.
There is no undo button, so the eraser is how you take back a stroke you regret. Clear is the blunt option when a mask has got away from you.
The size range is deliberately narrow. A 30 pixel brush is for edges and thin things like cables. A 150 pixel brush is for covering a car.
Work big first and tidy small. Fill the body of the object at 150, then drop to 30 and clean the boundary.
Thirty pixels sounds small until you remember it is measured against the full size image rather than against what you see on screen.
On a large photo a 30 pixel brush is a fine line. On a small one it is already fairly broad, which is why cables in low resolution shots are awkward.
The two modes trip people up more than anything else on the toolbar. If your strokes are not landing, check whether you left the tool in pan and zoom.
Zooming in before you paint an edge is worth the extra clicks. The brush scales with the zoom level, so a 30 pixel brush at high zoom gives you genuinely fine control.
Reset view puts you back to the full picture when you have zoomed too far in to know where you are. It only appears while you are in pan and zoom mode.
A habit worth forming is to zoom out and look at the whole mask before processing. Marks made at high zoom can turn out to cover far more than you meant.
What fills the hole
The area you marked is rebuilt from what surrounds it. Texture, lighting and perspective from the neighbouring pixels all feed the repair.
Perspective is the part people underestimate. A removal on a receding pavement has to continue lines that are converging, and it does try.
Straight architectural lines running through a mask are the honest weak spot. A window frame crossing the marked area often comes back with a small kink in it.
Everything outside your mark is untouched and keeps its original resolution. That is why a removal does not soften the rest of the photo.
It also sets the limit. The fill can only invent something plausible from context, so it needs context to copy.
An object filling most of the frame leaves almost nothing to work from. Something occupying a modest part of the picture is the comfortable case.
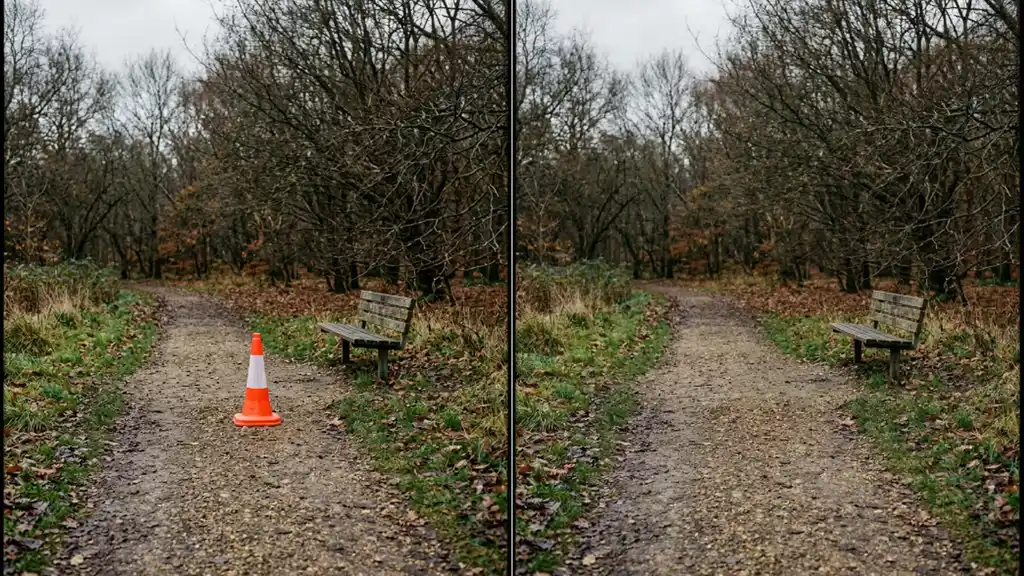
The things people remove most are predictable. A person who wandered into the frame, power lines across a view, a bin, a road sign, a parked car, a small blemish or a text overlay.
Every one of those is a modest object on a larger background, which is exactly the shape the tool is good at.
You can mark several things in one go. Paint every area you want gone, then process once.
For very large or scattered objects, two passes usually beat one. Remove the biggest thing, look at the result, then mark whatever is left.
Each pass costs two credits, which makes the two pass habit cheap enough to be the default rather than a compromise.
Between passes you are working on the result of the last one, not the original. That is usually what you want, and it does mean a mistake compounds.
Download the version you liked before running another pass over it. Going back is otherwise a matter of history rather than undo.
Backgrounds that work and backgrounds that fight you
The thing behind your object decides the result more than the object does.
- Sky, water, sand, grass and plain walls fill in almost invisibly. Continuous surfaces are the easy case.
- Busy repeating patterns are hard. Brickwork, tiling and fabric prints tend to come back subtly misaligned.
- A face sitting close behind the object is the worst case, because the fill will try to invent part of it.
Check the boundary of the repair at full size rather than as a thumbnail. A seam that is invisible small is obvious once printed.
Look along the edge rather than at the middle. The centre of a repair is almost always convincing and tells you nothing.
If a patterned background comes back wrong, a second smaller pass over just the misaligned strip often tidies it.
Low resolution or heavily compressed sources show more artefacts inside the edited patch. The rest of the photo is fine, but the repaired area is where weakness surfaces.
That asymmetry is worth expecting. A removal on a weak source leaves one soft patch in an otherwise consistent picture, and the eye finds it.
Where removals go wrong
Four mistakes account for most bad results, and three are about the mask.
The first is forgetting the shadow. Remove a person and leave their shadow and you get a photo with an unexplained dark shape in it.
Paint the shadow and any reflection as part of the same mark. They belong to the object even though they do not look like it.
The second is a mask that is too tight. Because the tool grows your mark slightly, a stroke that stops short of the object edge still leaves a rim of it behind.
Cover the object fully and a little beyond. Undershooting costs you a whole run.
The third is marking too much at once. A single mask covering half the frame gives the fill nothing to reference.
The fourth is judging the result before looking at the edges. The middle of a repair is usually fine and the boundary is where it fails.
A fifth worth naming is the object that was never really separate. A reflection in a shop window, or a person partly behind a railing, has no clean boundary to paint.
Those cases need a decision about what you actually want left behind, not a bigger brush.
If the change you want is described more easily than it is painted, the AI Image Editor takes a written instruction instead and is the better door for anything that is not simply gone.
The discipline of naming what changes and protecting the rest is the same one that makes a written edit land, which is worked through in change a car color with a prompt.
Paint the object, its shadow and a small margin. Leave a gap beside anything you want kept. Then check the edges.